


Triathlon Fueling Guidelines
Sports Dietitian Bob Seebohar was the personal sports dietitian for the 2008 U.S. Olympic Triathlon team and takes a cutting-edge approach to nutrition with his Metabolic Efficiency
Let’s get one thing straight. A good home calisthenics routine isn’t about fancy handstands or looking good on Instagram. For endurance athletes—runners, triathletes, cyclists—it’s about building raw, functional strength that translates directly into power, resilience, and injury prevention. We’re talking about building an engine, not just the paint job. The beauty of it is that you need zero fancy gear, and you can scale it whether you’re a seasoned marathoner or just getting off the couch. It’s a seriously powerful way to build muscle and endurance right from your living room.
Contents
Look, you’ve seen a hundred fitness fads come and go. One minute it’s kettlebells, the next it’s some new-fangled machine from a late-night infomercial. But a solid home calisthenics routine is different. This isn’t a trend; it’s a return to the fundamentals of human movement, and it’s blowing up across Australia for a very good reason.
Countless Aussies are ditching pricey gym memberships and crowded weight rooms for powerful workouts in their living rooms, backyards, or local parks. This isn’t just about saving a few bucks on a Fitness First membership. For endurance athletes, it’s about efficiency and building strength that actually makes you a better runner, cyclist, or triathlete.
At its core, calisthenics is simply about mastering your own bodyweight as resistance. There are no complicated machines or intimidating racks of dumbbells. It’s just you against gravity. And for an endurance athlete, that simplicity is its greatest strength.
The benefits are immediate and incredibly practical:
Here’s the thing: Calisthenics teaches you incredible body awareness. You learn how to create tension, control your movements, and understand your physical limits in a way that just lifting external weights often masks. For an athlete, this proprioception is pure gold.
This isn’t some niche hobby anymore. Bodyweight training has become a massive part of the national fitness scene. In fact, the latest AusPlay data shows that over 6 million Australians regularly engage in fitness activities that include bodyweight exercises.[1] This huge figure points to a clear shift towards flexible, cost-effective training that actually fits a modern lifestyle. People are choosing results over expensive contracts. You can read the full AusPlay survey results to see the data for yourself.
Ultimately, starting a home calisthenics routine is about taking back control. It’s an empowering, accessible, and incredibly effective way to build the strongest version of yourself—on your own terms and in your own space. Forget the fads; this is about building fundamental, sustainable strength that lasts a lifetime.
Look, I get it. You’re busy, you’re keen to get stuck into the main workout, and the warm-up feels like something you can skimp on. I’ll be honest with you, jumping straight into a tough home calisthenics routine is one of the fastest ways to get injured. It’s a classic rookie mistake I see all the time, especially with time-crunched athletes.
A smart warm-up isn’t just about a few lazy arm circles or a half-hearted hamstring stretch. This is about preparing your body for the specific demands of calisthenics. We’re talking about a dynamic warm-up designed to activate the exact muscles and prime the joints you’re about to put under load.
It’s a small investment of five to ten minutes that pays massive dividends. Think of it as mentally flipping the switch to ‘go time’ while telling your muscles, tendons, and central nervous system to wake up and get ready for work. This small effort unlocks better performance, improves your range of motion during the exercises, and, most importantly, keeps you off the physio’s table.
To get the most from your session, you need to focus on moving your body through its full range of motion, not just holding static stretches. It’s about increasing blood flow and improving mobility where it counts, especially in those tight runner’s hips.
This simple process flow shows the three key areas to hit before any home calisthenics routine.
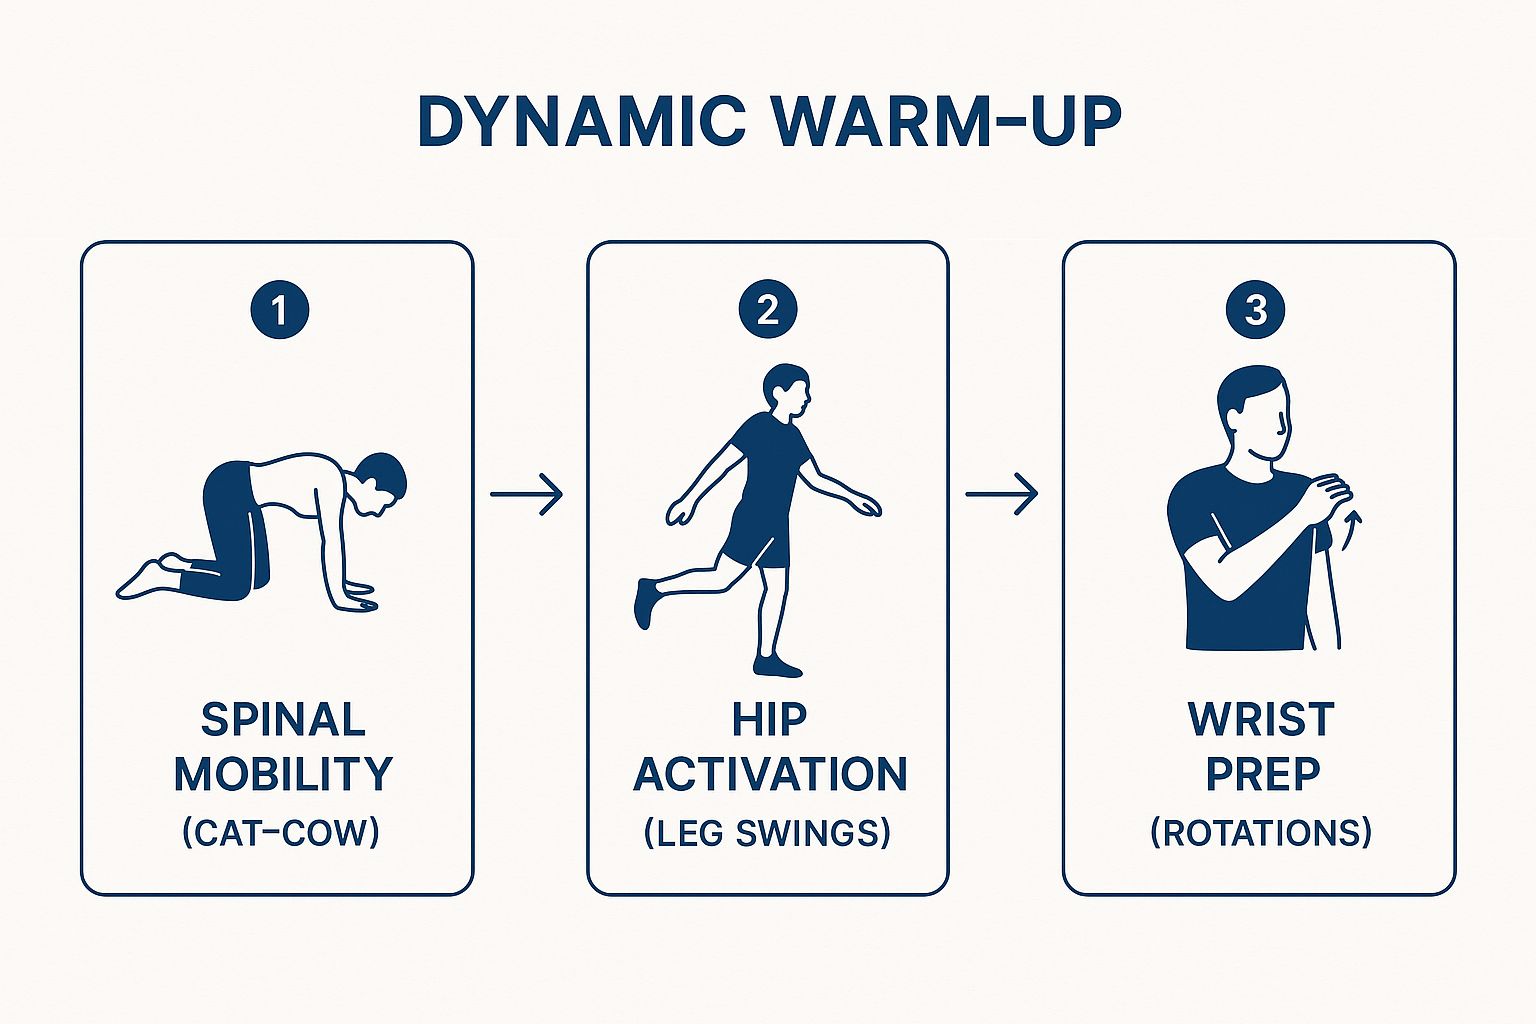
This sequence ensures you’re preparing your body from the core outwards, addressing spinal mobility first, then activating the major hip joints, and finally prepping the smaller, vulnerable wrist joints for weight-bearing exercises like push-ups.
Your warm-up should feel like you’re gradually turning up the dial on your body, not shocking the system. Here’s a practical sequence you can follow:
I can’t stress this enough: Your wrists are often the weakest link in bodyweight training. Don’t ever skip wrist prep. Consistent, gentle mobilisation is what builds resilience and prevents those nagging aches and pains that can derail your training.
Beyond static stretches, incorporating dynamic movements and mobility work into your warm-up can significantly enhance performance and prevent injuries. For a deeper dive into improving your movement, consider these 8 Essential Mobility Exercises for Athletes. It’s a fantastic resource for adding variety and targeting specific tight spots.
This isn’t just about avoiding injury today; it’s about building a more resilient, mobile body for the long haul.
Alright, theory is done. Time to get to work. I’m going to lay out a complete, full-body home calisthenics routine you can start doing today. There’s no fancy gear and no confusing movements, just the stuff that actually gets results for endurance athletes.
We’re going to build this entire workout around five core human movement patterns. Mastering these is the key to building real, functional strength that you can use on the road, on the trail, or in the pool.
For each pattern, I’ll walk you through the go-to exercise, show you how to do it right, and point out the common mistakes I see people make all the time. Think of this as your practical guide to building a rock-solid and, most importantly, safe foundation.

The plan is simple: we’ll perform these exercises in a circuit. You’ll do one set of an exercise, rest for about 60-90 seconds, and then jump straight into the next one on the list.
Once you’ve gone through all five exercises, that’s one complete round. Take a longer break of 2-3 minutes, grab some water, and then get ready to go again. You’ll repeat the entire circuit for a total of 3-4 rounds.
This circuit style is brilliant because it keeps your heart rate elevated and makes the whole workout incredibly efficient. A full session shouldn’t take you more than 30-45 minutes. Perfect to slot in after an easy run or on a recovery day.
Let’s break down each movement. I’ve picked beginner-friendly versions that you can easily make harder as you get stronger. But listen up: form is everything. I can’t say this enough. Rushing through with bad form is a fast track to getting zero results and, even worse, getting injured.
This is the undisputed king of upper-body exercises. It hammers your chest, shoulders, and triceps all at once. For runners, a strong upper body means better arm drive and posture, especially when fatigue sets in.
The perfect partner to the push-up. This move strengthens your entire back and your biceps, combating that hunched-over posture many cyclists and runners develop.
This one’s non-negotiable. It’s the foundation for building strong quads, hamstrings, and glutes—your primary power-producers for running and cycling.
The hinge pattern is crucial for developing what we call the posterior chain—all the powerful muscles on the backside of your body. Strong glutes and hamstrings are the key to injury prevention and raw power.
The plank is the ultimate test of core stability. It teaches your entire midsection to stay braced and strong, which prevents your form from falling apart in the last 10km of a marathon.
As you get more comfortable with this routine, you might start thinking about what comes next. Understanding some home gym equipment essentials can give you ideas for the future, but for now, your body is all you need.
Here’s a simple table to put it all together.
This table breaks down your workout into a clear, actionable plan. Each exercise is chosen to create a balanced session that hits every major muscle group, ensuring you build well-rounded, functional strength right from day one.
| Movement Pattern | Beginner Exercise | Target Muscles | Sets x Reps |
|---|---|---|---|
| Push | Incline or Knee Push-Ups | Chest, Shoulders, Triceps | 3-4 sets of 8-12 reps |
| Pull | Inverted Rows | Back, Biceps | 3-4 sets of 8-12 reps |
| Squat | Bodyweight Squats | Quads, Glutes, Hamstrings | 3-4 sets of 15-20 reps |
| Hinge | Glute Bridges | Glutes, Hamstrings | 3-4 sets of 15-20 reps |
| Core | Plank | Abs, Obliques, Lower Back | 3-4 sets of 30-60 sec hold |
Stick to this plan, focusing on perfect form, and you’ll build a fantastic base of strength.
Here’s what I’ve learned from years of coaching: Consistency will always beat intensity. Aim to do this routine 2-3 times per week on non-consecutive days. That’s the sweet spot. It gives your body enough time to recover and actually get stronger. Don’t try to be a hero and burn yourself out in the first week. This is a long game.
Alright, so you’ve got the basics down pat. You’re consistently knocking out your push-ups, squats, and rows. But here’s the thing: just doing the same 10 push-ups and 20 squats three times a week, forever, won’t keep making you stronger.
You’ll get really good at that specific workout, and then your progress will hit a brick wall. The secret to real, continuous strength gains isn’t just about consistency; it’s about a non-negotiable training principle called progressive overload.
Put simply, this just means you have to keep making your workouts a little bit harder over time. This challenge forces your muscles to adapt, rebuild, and come back stronger. When you’re in a gym, this is dead simple—you just slide another plate onto the barbell. But how do you apply it when the only equipment you have is… well, you?
This is where bodyweight training gets really clever. You have to learn to be your own coach, intelligently tweaking your home calisthenics routine each week to create that crucial “harder than last time” stimulus. And trust me, it’s about a whole lot more than just grinding out more reps.
Look, adding another rep or two to each set is the most obvious way to progress, and it absolutely works—to a point. But it’s only one tool in your toolbox. Eventually, you’ll hit a wall where doing 50 push-ups in a single set becomes more of an endurance challenge than a pure strength builder.
Let’s dig into the smarter, more effective ways to apply progressive overload to your bodyweight exercises.
Here’s the key takeaway: You only need to change one variable at a time. Don’t try to attempt a harder variation, for more reps, with less rest, all at once. Pick one method, stick with it for a few weeks until it feels manageable, and then change something else. That’s how you build sustainable, long-term results.
This is the big one for calisthenics. By simply changing the angle of an exercise, you can dramatically alter how difficult it is by shifting your centre of gravity.
Slowing down your movements is a brutally effective way to make any exercise feel tougher. It forces your muscles to stay contracted for longer, which is a massive stimulus for growth and strength.
Try using a tempo. For example, on your squats, count to three on the way down, pause for a full second at the bottom, and then explode back up in one second. This “3-1-1” tempo will make 20 squats feel infinitely harder than just banging them out quickly.
Here’s another simple but potent method. If you’re currently resting for 90 seconds between your sets of push-ups, try cutting that down to 75 seconds next week. The week after, aim for 60 seconds.
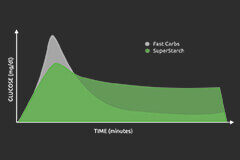
Reducing your rest periods forces your body to become more efficient at recovery and seriously challenges your muscular endurance. It can turn your strength session into a solid conditioning workout, too. This is also where your fuelling strategy becomes critical; better recovery starts with smart nutrition. You can explore this more in our ultimate guide to performance nutrition, which covers how to fuel for efforts like these. I’ll be honest, if you’re doing intense circuits, you need fuel that won’t cause a sugar crash. A UCAN Energy gel before a session like this provides steady energy without the spike.
Once you’ve well and truly mastered a foundational move, it’s time to level up. For many people, this is the most exciting part of calisthenics. Every basic exercise has a whole family tree of harder variations just waiting for you to unlock them.
To make things clearer, there are several ways you can apply progressive overload to your home workout. Each technique offers a unique stimulus to keep your body adapting.
| Technique | How It Works | Example Exercise Application |
|---|---|---|
| Increase Reps/Sets | Performing more total work in a session. | Move from 3 sets of 10 squats to 3 sets of 12, then 4 sets of 12. |
| Alter Leverage | Changing body angles to lift a greater percentage of your bodyweight. | Progress from incline push-ups to flat push-ups, then to decline push-ups (feet elevated). |
| Increase Time Under Tension | Slowing down the movement to keep muscles contracted for longer. | Lower into a push-up over 3-4 seconds instead of 1 second. |
| Decrease Rest Time | Challenging your muscular endurance and recovery capacity. | Cut the rest between plank holds from 60 seconds down to 45 seconds. |
| Move to a Harder Variation | Increasing the complexity and stability demands of the exercise. | Once you master glute bridges, progress to single-leg glute bridges. |
As you can see, you have plenty of options to keep things challenging without ever needing to pick up a weight.
This isn’t about making random changes whenever you feel like it. It’s about having a plan. Get a notebook or use an app to track your workouts. Know exactly what you did last week so you know exactly how you’re going to challenge yourself this week. That’s the real secret to getting stronger.
It’s easy to feel like you’re on a solo mission when you’re training at home. Most days, it’s just you, the living room floor, and the promises you made to yourself about sticking to your home calisthenics routine. But here’s something to remember: you’re not alone. Not even close. You’re part of a massive, passionate community right here in Australia.
Tapping into that bigger picture can be a huge game-changer for your motivation, especially on those days when the couch is calling your name a little too loudly after a brutal interval session in the Brisbane humidity.

The calisthenics scene in Australia is absolutely booming. It has well and truly moved beyond a few hardcore athletes in local parks. These days, you’ll find everything from casual weekend meetups organised on social media to seriously high-level national competitions.
The best part? It’s not some exclusive club for elite athletes pulling off impossible-looking moves. The culture is incredibly supportive and genuinely welcoming to everyone, no matter where you are on your journey. Whether you can bang out ten muscle-ups or you’re still working on that first proper push-up, you’re part of the same movement.
I can’t stress this enough: understanding that you’re part of a community makes the solo sessions feel less isolated. You’re not just doing a workout; you’re joining a culture built on mutual respect and shared progress.
Organised groups and federations are making calisthenics more accessible than ever, and that strengthens the entire scene—even for those of us training in our own backyards. The competitive side of the sport is thriving, which is a fantastic sign of its overall health and growing cultural relevance.
Take the Australian Calisthenic Federation (ACF), for example. They now run huge events like the AusCaliCarnivale. Their 2025 event pulled in over 3,000 in-person attendees across seven days. That’s not some small, niche gathering; it’s proof of the massive engagement in the sport that goes far beyond just casual home practice. The ACF is even rolling out a new framework over the next four years to support this growth and keep the sport inclusive.
This sense of community is a powerful tool. Sharing tips, celebrating each other’s progress, and learning from others are all part of the journey. For a dose of inspiration and stories from athletes just like you, check out the collection of UCAN tips and stories on our blog. It’s a great way to see how others are tackling their own training challenges and smashing their goals.
Alright, let’s get into the nitty-gritty. Once you start a home calisthenics routine, a bunch of practical questions always seem to pop up. It’s totally normal. This is where we tackle them head-on, giving you clear, no-fluff answers to push past those common sticking points and keep you on track.
My goal here is to arm you with the confidence and knowledge to troubleshoot your own training. Let’s clear up the confusion so you can focus on getting stronger.
This is easily the most common question I get, and the answer isn’t “every day.” Look, I get the enthusiasm, but your muscles don’t get stronger during the workout; they get stronger when they recover after the workout.
For the full-body routine we’ve outlined, hitting it two to three times per week is the sweet spot. Make sure you leave a day in between—think Monday, Wednesday, Friday. This gives your body a solid 48 hours to repair and adapt, which is exactly how you build real, lasting strength.
Trying to do it every day is just a fast track to burnout and injury, not better results. Consistency over frequency is the name of the game.
Honestly? No, you don’t. While a pull-up bar is arguably the single best piece of equipment for a home calisthenics setup, it’s not a day-one essential.
The inverted row, done under a sturdy table, is a fantastic substitute that hits the same back and bicep muscles. Master that first. Once you can comfortably knock out several sets of 10-15 clean reps, that’s the perfect time to think about investing in a doorway pull-up bar. Start with the basics, earn the progression, and then add the gear.
Here’s what I’ve learned after years of this: Don’t let the lack of “perfect” equipment stop you from starting. The most effective home calisthenics routine is the one you actually start and stick with, using what you’ve got right now.
First off, don’t panic. Hitting a plateau is a completely normal—and even expected—part of any training journey. It’s actually a good sign! It means your body has successfully adapted to what you were throwing at it. Now, it’s just asking for a new challenge.
This is where progressive overload becomes your best mate. If you’ve stalled, it’s time to tweak one of the variables we talked about earlier.
The key is to make one small, deliberate change to make the workout harder again. A plateau isn’t a dead end; it’s just a signpost telling you it’s time to take a slightly different path. For more detailed answers on training and nutrition sticking points, you can always explore the comprehensive UCAN FAQ section.
Absolutely. This is one of the biggest strengths of calisthenics—its incredible scalability. It doesn’t matter if you’re 18 or 68; the principles are the same. You just start with a version of an exercise that is safe and manageable for you.
For example, a standard push-up might be too much, but a wall push-up (where you stand and push off a wall) is accessible to almost everyone. From there, you can progress to an incline push-up on a kitchen counter, then a lower coffee table, and so on. Every single exercise has a regression.
In fact, the sport is incredibly inclusive. The Calisthenics Association of Western Australia promotes it for everyone from three years old upwards, highlighting its benefits for fitness, coordination, and confidence. With community clubs all over Perth, it shows how adaptable bodyweight training is for all ages and abilities. Discover more about their inclusive approach to the sport. Your starting point doesn’t matter; what matters is that you start.
References
[1] Australian Sports Commission. AusPlay November 2023 Report. 2023.
At Generation UCAN, we’re all about providing the steady, reliable energy you need to power through workouts like these and recover stronger. To keep your engine running without the sugar crash that kills your endurance, give our unique LIVSTEADY™ formula a try.

 14Aug
14Aug  14Aug
14Aug  14Aug
14Aug  24Jan
24Jan  15Aug
15Aug  16Aug
16Aug
Comments are closed