Pull Up Progression is one of the most efficient, high-return ways for endurance athletes to add functional upper-body strength without compromising weight or aerobic fitness. In the first 100 words of this guide you’ll get clear, practical steps — from dead hangs and scapular pulls through negatives and banded reps — plus how to schedule, fuel and apply this work around marathon, triathlon and cycle training in Australia.A smart pull-up progression is not bodybuilding fluff. It’s a systematic, coach-led sequence that uses bodyweight and simple tools (bands, a bar, a bench) to build lats, scapular control, core stiffness and grip — all of which translate to better running posture, a more powerful swim stroke and improved bike stability during long, hot training blocks like those we face on the Gold Coast or around Melbourne.
Why Bother With Pull-Ups If You’re an Endurance Athlete?
Let’s be blunt: your training calendar is full. But adding a targeted pull up progression delivers clear race-day benefits you can measure — not just more muscle. Here’s the practical payoff and how to connect these gains to your next event.
- Stronger running form: Keep your torso upright and arm drive effective when fatigue hits — especially important in the final 10 km of the Gold Coast Marathon or a hot, humid Sydney half. Better upper-back endurance reduces forward collapse and maintains economy (lower energy cost per km).
- More power in the swim: Improved lat strength and scapular control lets you produce greater propulsive force per stroke — critical for open-water starts and choppy Ironman Cairns conditions.
- Bike stability and comfort: Stronger posterior chain and lats help you hold an aero position longer with less shoulder fatigue on long Beach Road or Pacific Highway rides.
It’s All About Strength-to-Weight Ratio
Pull-ups are a pure, scalable test of strength-to-weight. You’re training the exact capacity you need: moving your own body efficiently. For athletes where power-to-weight matters, that specificity is gold. Start with the Australian pull-up (inverted row) to load the same muscles at a manageable angle and progress toward vertical pulls.
You’re not just building muscle; you’re building a more resilient, efficient and injury-resistant racing engine — weight-neutral strength that helps you run, swim and cycle better.
For foundational resources on horizontal pulling and bodyweight back work, see our guide to the best bodyweight back exercises.
Laying the Groundwork for Your First Pull Up
Start specific. Don’t rush to the bar and try to yank yourself up — that’s how people get stuck. The first phase of a pull-up progression is about control, scapular strength and time under tension. These are non-negotiable if you want to progress reliably without injuries.
This infographic (keeps existing visual) highlights core stability with the dead hang — a simple but effective place to start. The goal of phase one is consistent improvements in duration, control and technique over four weeks.
Why This Actually Works: Activating the Right Muscles
Three drills build the neuromuscular template you need:
- Scapular pulls (what to do): From a dead hang, depress and retract the scapulae — no elbow flexion — hold 1–2 seconds and release. 3 sets of 10–15 reps.
- Dead hangs (what to do): Hang from the bar with active shoulders (scapular depression) for 30–60s per set. 3 sets. Gradually increase to 60s+.
- Australian pull-ups / inverted rows (what to do): Perform with body straight as a plank; pull chest to the bar. 3 sets of 8–12 reps to technical failure.
Why it works: Scapular pulls teach the motor pattern of initiating a pull from the back (lat-driven) rather than the arms. Dead hangs build grip and shoulder health while increasing time under load. Australian pull-ups approximate the pull path with reduced load, allowing high-quality repetitions and a clear progression by changing angle.
How to apply: Use these drills 2–3x/week for four weeks as described in the table below. If you’re in a marathon build, schedule them on easy running days or as a short standalone session — never before a key quality run.
How to Apply It: Phase 1 Foundational Strength Builder
Follow this 4-week block exactly as a minimum. Track small weekly improvements (hang time, reps, band strength). If you can progress a little each week, the neural and muscular adaptations compound quickly.
| Exercise | Sets & Reps | Focus Point |
|---|
| Dead Hangs | 3 × 30–60 s | Active shoulders; engage lats; breathe steady. Progress 5–10 s/week. |
| Scapular Pulls | 3 × 10–15 | Small range; no elbow bend; pause 1 s at top to reinforce motor pattern. |
| Australian Pull Ups (Inverted Rows) | 3 × 8–12 (to technical failure) | Body straight; full chest-to-bar; lower slowly. Lower the bar to increase difficulty. |
Coach’s note: if your grip is the limiting factor, finish with an extra dead-hang set or a short farmer’s carry (2 × 30–60 m). This ensures grip improvements keep pace with pulling strength.
Building Real Pulling Power with Progression Drills
Once the foundation is stable (you’re consistently hitting hang times and row reps), it’s time to progress vertically. We focus on two high-leverage tools: negative (eccentric) pull-ups and band-assisted pull-ups. Both are specific, measurable and scalable.
Technique is everything here — sloppy negatives or bouncing on bands will limit gains and increase injury risk.
Why Negatives Are The Secret Sauce
What to do: Step or jump so your chin is over the bar, then lower under control for 3–5 seconds until full hang. 3–5 reps per set, 3 sets. As you improve, increase descent duration to 5–6 seconds.
Why it works: Muscles are stronger eccentrically (during lengthening). Eccentric overload produces rapid strength and hypertrophy signals with lower metabolic demand than multiple concentric reps, which suits endurance athletes who must preserve aerobic fitness.
How to apply: Replace one row session per week with 3 sets of controlled negatives. If you’re in a base week for marathon training, do negatives the day after an easy run to avoid interfering with a quality threshold session.
Coach’s Tip: Resist the urge to drop. Control the descent. A 3–5 s eccentric produces far more adaptation than a fast uncontrolled drop.
How to Use Resistance Bands Correctly
What to do: Anchor a band to the bar and place a foot (or knee) in the loop. Choose the lightest band that still allows you to complete sets with strict form: full hang start → chin clears bar → controlled descent. 3 sets of 6–10 reps depending on band assistance.
- Loop it right: Use a secure knot or band anchor; check bands for wear before each session.
- Stay active: Keep core tight and scapula engaged; don’t let hips sag.
- Full range of motion: Start each rep from a passive hang and finish with the chin clear of the bar.
- Progressive overload: Move to a thinner band or fewer assisted reps as strength improves.
Why it works: Bands provide variable assistance — most assistance at the bottom (where you’re weakest) and less at the top — mirroring the real strength curve and encouraging mid-range and top-end control.
How to apply: Use bands for 1–2 sessions per week during the early vertical phase. When you can do 3 × 8–10 with a thin band, reduce assistance level. For a triathlete mid-season, a banded session can be done after a short spin (easy) to combine specificity with low impact.
These methods are consistent with military and sports science approaches to pull-up progression where specific practice and eccentric-focused work accelerate gains.[1]
How to Schedule and Fuel Your Strength Work
Scheduling and fuelling decide whether the strength work helps or hinders your primary goal — endurance performance. Here is a clear, athlete-friendly roadmap.
When to Schedule Your Sessions: The ‘How to Apply’ Bit
Basic scheduling rules:
- Never before a key session: Don’t do maximal pull-up work the day before long runs, intervals or key bike sessions. Allow 36–48 hours for recovery before those workouts.
- Combine with easy days: Best slot is after an easy run/ride — warm-up is already done, but you’re not racing energy systems.
- Standalone short sessions: If time allows, schedule a 20–30 minute strength session on an easy or recovery day.
Example week for a runner building to a half marathon:
- Mon: Easy 40 min run + foundational pull-up work (phase 1)
- Tue: Intervals (speed) — no strength
- Wed: Easy 60 min + light banded pull-up session (technique)
- Thu: Tempo — no strength
- Fri: Recovery ride + dead hangs & grip work
- Sat: Long run — no strength
- Sun: Optional mobility + core
How to Fuel for Strength and Recovery
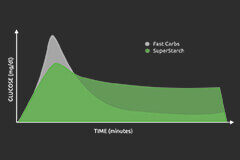
What to do: Eat a small, low-glycaemic carbohydrate snack 20–40 minutes before a short strength session to provide available energy for high-quality reps. After training, prioritise a 3:1–2:1 carb:protein recovery window within 60 minutes.
Why it works: Short, intense strength efforts require rapidly available energy while avoiding a big insulin spike that can lead to a crash. Post-workout carbs + protein optimises muscle protein synthesis and glycogen replenishment for athletes combining strength and aerobic work.
How to apply: For short strength sessions (20–40 min) try UCAN Energy Gel 15–30 minutes before the session — it provides steady release energy without sharp sugar peaks. After the session, a UCAN Energy + Protein shake gives a convenient carb:protein ratio to kickstart repair. For long sessions or heavy training days, include electrolytes to replace sweat losses: UCAN electrolytes.
Pre-workout: UCAN Energy Gel 15–30 min before — steady fuel for short strength sessions. Post-workout: UCAN Energy + Protein within 60 min to support repair and recovery.
Going from One Rep to Many
First strict pull-up — huge milestone. Now the work becomes about making it repeatable and efficient. That means neural efficiency and targeted overload, not just grinding reps.
Pushing Past the Plateau
What to do: Use two robust methods — Grease the Groove (GTG) and strategic weighted progressions.
- Grease the Groove (GTG): 1 perfect rep multiple times per day (e.g., 6–10 small touches). The goal is high-quality motor patterning without fatigue. Apply daily for 2–4 weeks alongside fewer heavy practice sets in the gym.
- Weighted Pull-ups: Add very small loads (2.5–5 kg) for low-rep strength sets (3–5 reps, 3–5 sets) once per week for 4–6 weeks. After a cycle of overload, drop the weight and retest bodyweight reps.
Why it works: GTG increases neurological efficiency and skill with minimal fatigue. Small weighted overload increases motor unit recruitment and strength, then when weight is removed your bodyweight feels lighter.
How to apply: If you can do 1 strict pull-up: incorporate GTG daily and one weighted session per week. If training for endurance events, schedule the weighted session 48+ hours from your hardest run or bike interval.
This isn’t ego lifting — it’s strategic overload. Small, controlled weight forces recruitment of more fibres and speeds strength adaptation.
It’s a Marathon, Not a Sprint
Records like Jaxon Italiano’s 8,008 pull-ups in 24 hours illustrate what long-term, consistent practice creates — but most athletes only need a reliable set of 5–10 strict pull-ups to improve posture, swim and bike performance. Aim for quality: 3–4 sets of 1–4 reps in your sessions and gradually increase volume.
Your Top Pull-Up Questions, Answered
Below are the precise answers you and other endurance athletes ask most often.
How Long Does a Pull-Up Progression Actually Take?
Range: 6 weeks to 6 months. Key variables: starting strength, body mass, training frequency, and recovery. Daily targeted practice (GTG) plus 2 structured sessions per week can shorten timelines; inconsistent training or under-recovery extends them. Focus on measurable weekly progress (hang time, negative duration, row reps).
Can I Do This During a Marathon Training Block?
Yes — but prioritise your running. Schedule strength on easy days or after easy runs. If you’re in a high-mileage week or heat wave, back off intensity and focus on hangs, scapular pulls and technique. Always fuel these sessions appropriately to protect endurance output.
Are Resistance Bands Better Than an Assisted Pull-Up Machine?
For most endurance athletes, yes. Bands provide variable assistance that mirrors the strength curve of a pull-up and force stabilisers to work. Assisted machines can create an artificial path and reduce stabiliser recruitment. Use bands and progress to thinner bands rather than relying on assisted machines.
My Grip Fails Before My Back Does. What Should I Do?
Directly train grip: add dead hangs (extra set), farmer’s carries (2 × 30–60 m) and towel hangs. Also consider using chalk where permitted. Improving grip removes the bottleneck so your back strength can convert to more reps.
References
[1] Roig, M., O’Brien, K., Kirk, G., Murray, R., McKinnon, P., Shadgan, B., & Reid, W. D. (2009). The effects of eccentric versus concentric resistance training on muscle strength and mass in healthy adults: a systematic review. British Journal of Sports Medicine, 43(8), 556–568.
[2] Andersson, E., Oddsson, L., Grundström, H., & Thorstensson, A. (1998). Muscle coordination in rapid and slow eccentric training. Journal of Electromyography and Kinesiology, 8(5), 307–317.
[3] Faries, M. D., & Greenwood, M. (2007). Eccentric exercise in conditioning. Strength & Conditioning Journal, 29(5), 84–92.
[4] U.S. Marine Corps. (n.d.). The Secret to Pullups: How to Go From 0 to 20+. marines.mil.
Ready to fuel your strength?
A smart pull-up progression requires smart fuel. Don’t let nutrition be the weak link — use steady-release carbs before short strength sessions and a carb:protein recovery after. Check the UCAN range for products that fit this approach:
👉 Shop UCAN Energy Gels
👉 Shop UCAN Energy + Protein


 14Aug
14Aug  14Aug
14Aug  14Aug
14Aug  24Jan
24Jan  15Aug
15Aug  16Aug
16Aug
Comments are closed