8 Best Tricep Workouts Home Edition: Build Strength in 2025
Alright, let’s have a real chat. You’re putting in the hard work — long runs along the Gold Coast, grinding up those brutal bike climbs in Adelaide Hills, or stacking up k’s for your next Melbourne Marathon. You’re dialled in on endurance — your lungs, your cadence, your mental toughness. But what if I told you one of the most overlooked assets in your endurance toolkit isn’t in your legs at all — it’s in your arms? Specifically, your triceps.
Sounds strange, right? We’re not talking about bulking up for aesthetics here. Strong triceps are a performance secret weapon. They stabilise your upper body during long efforts, maintain your running form when fatigue hits, and keep you locked into aero position on the bike without collapsing through your shoulders. Weak triceps? That’s where form breaks down, energy leaks happen, and seconds slip away from your finish time. To truly round out your endurance capacity, pairing smart training with natural energy-boosting supplements can elevate your recovery, energy, and long-term resilience.
This guide is your blueprint for building stronger, more functional triceps at home — no fancy gym, no complicated routines. Just your body, a bit of space, and commitment. These tricep workouts home are designed to translate strength directly to endurance: better posture, more efficient movement, and power that lasts deep into the final stretch — whether you’re battling the Brisbane humidity or fighting through a cold Sydney headwind.
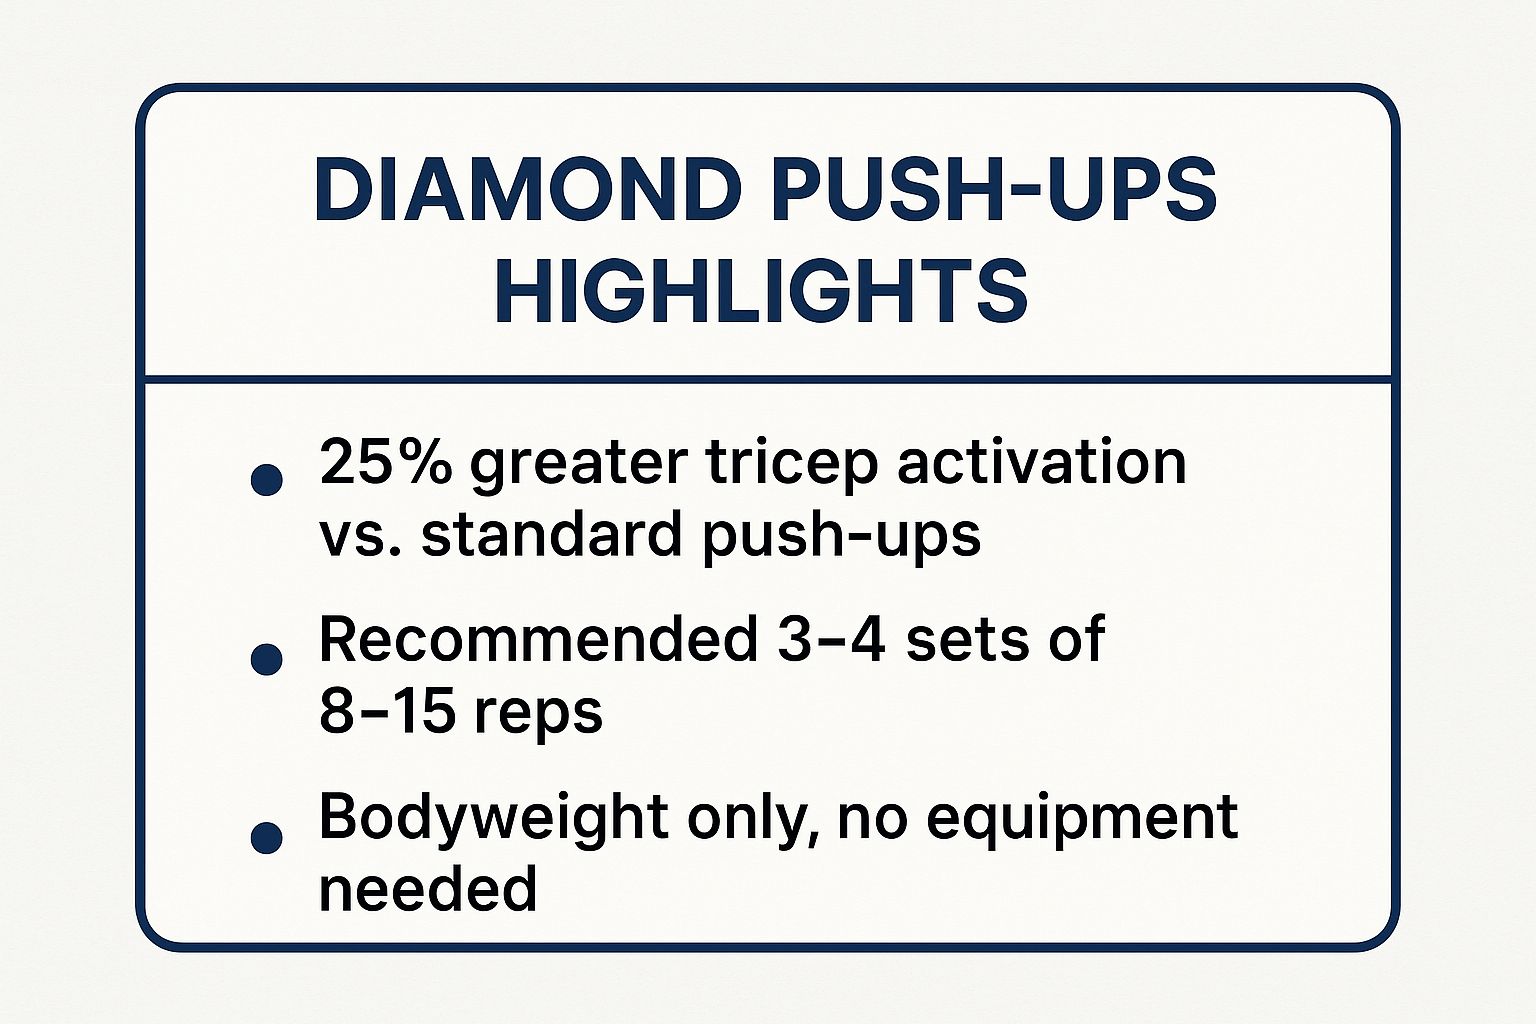
Let’s start with the king of bodyweight tricep exercises — the Diamond Push-Up. It’s brutally effective, beautifully simple, and requires nothing but your body weight. Trusted by military athletes and calisthenics professionals, this movement isolates the triceps in a way that few exercises can match.
The secret lies in the hand placement. When you bring your hands together under your sternum so your thumbs and index fingers form a diamond, the workload shifts away from your chest and shoulders and lands squarely on your triceps. This tiny tweak completely changes the mechanics, forcing the triceps to fire harder to stabilize and extend your elbows. It’s an instant upgrade to your push-up game.
How to Master the Diamond Push-Up
Set Your Foundation: Begin in a plank position. Hands together under your chest, body straight from head to heels.
Engage Your Core: Brace your abs and glutes. This alignment prevents sagging hips and keeps tension where it belongs — on your triceps.
Controlled Descent: Lower slowly by bending your elbows, keeping them tight to your sides. No flaring — your elbows should “brush” your ribcage.
Power Up: Drive through your palms and extend fully, feeling your triceps contract hard at the top.
Pro Tip: Too hard? Start from your knees or use an incline (bench, countertop). As your strength builds, drop the elevation until you’re floor-ready. Bonus: this narrow-hand setup also lights up your inner chest — check out our at-home chest exercises for more.
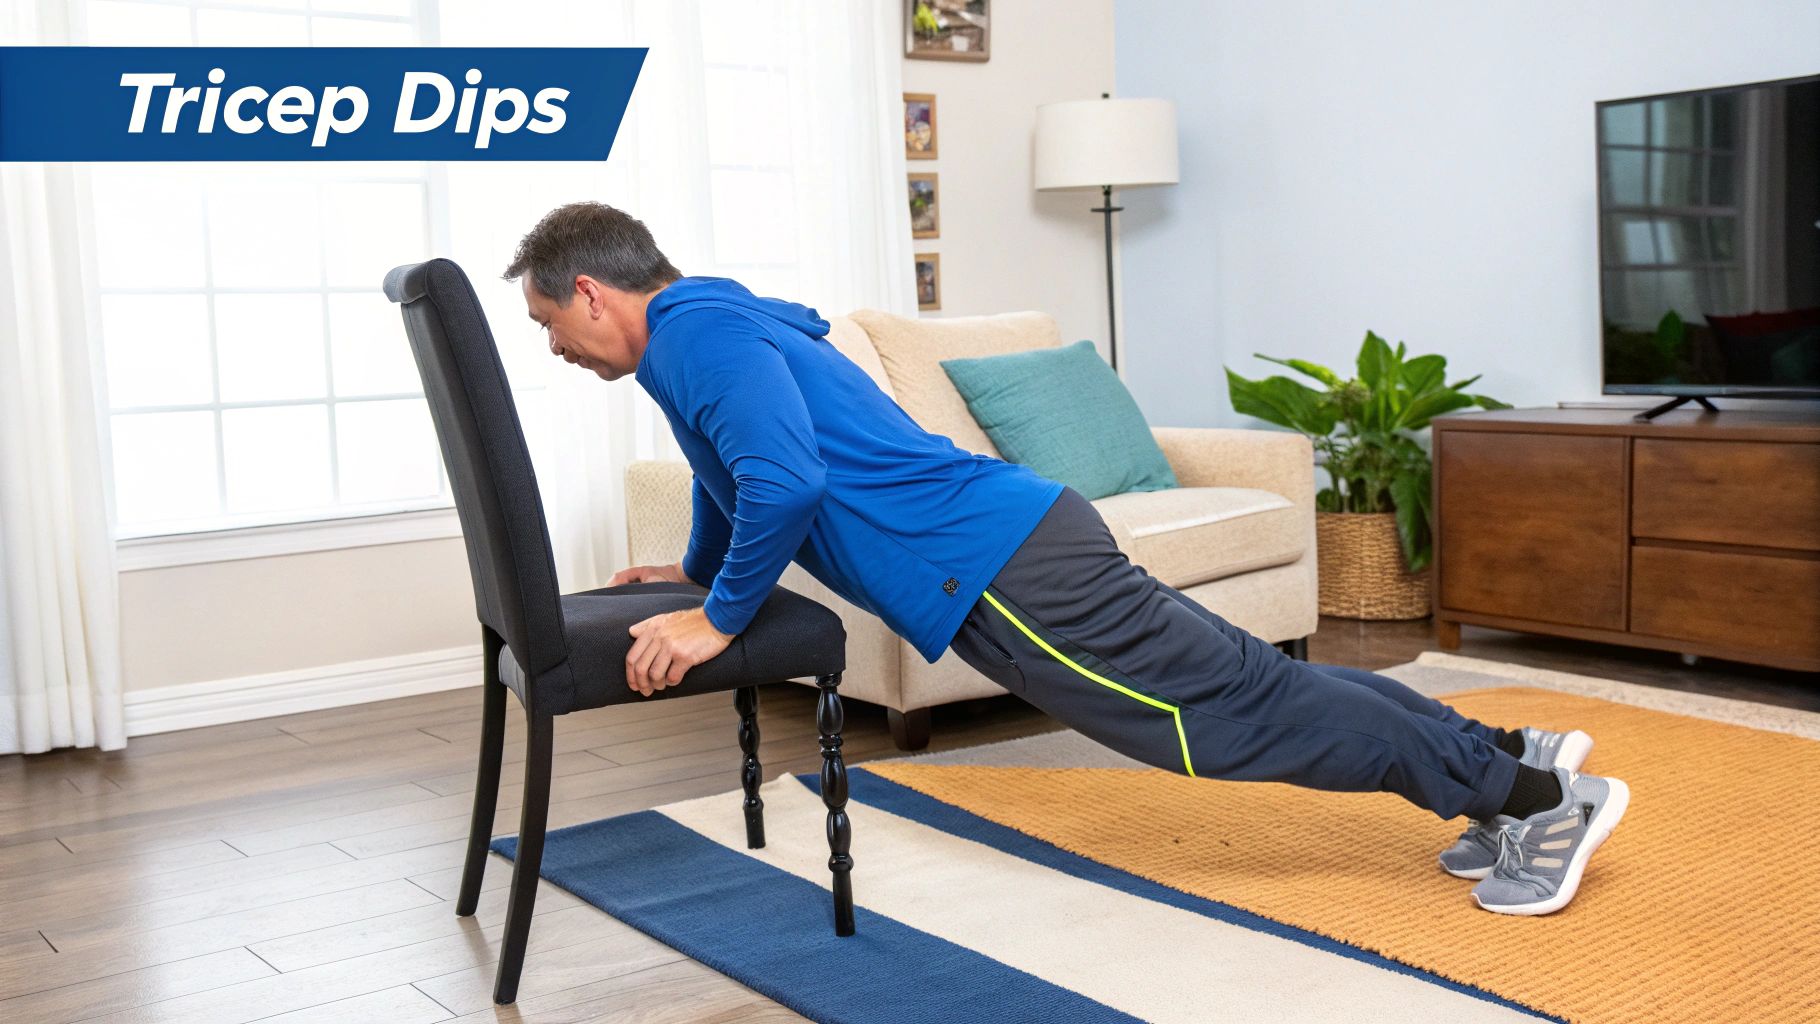
2. Tricep Dips (Chair Dips/Bench Dips)
The Chair Dip is the workhorse of home tricep training — a simple yet deadly effective movement. All you need is a sturdy surface and your body weight. This exercise hits all three heads of the triceps while also reinforcing shoulder stability and upper-body endurance.
Because dips are compound movements, they also challenge your chest and front delts. But here’s the real magic: you can easily scale them up or down. Whether you’re using a kitchen chair, park bench, or even parallel bars, you control the intensity.
How to Master the Tricep Dip
Setup: Sit on the edge of a chair or bench. Place your hands shoulder-width apart, fingers pointing forward.
Position: Slide your hips off the edge and support your weight with your arms.
Lower: Bend your elbows to 90 degrees, keeping your back close to the chair.
Push: Drive through your palms and extend your arms fully, squeezing at the top.
Pro Tip: For progression, elevate your feet or place a weighted backpack on your lap. Keep your shoulders down and chest tall to avoid strain. Aim for 3-4 sets of 10–15 reps.
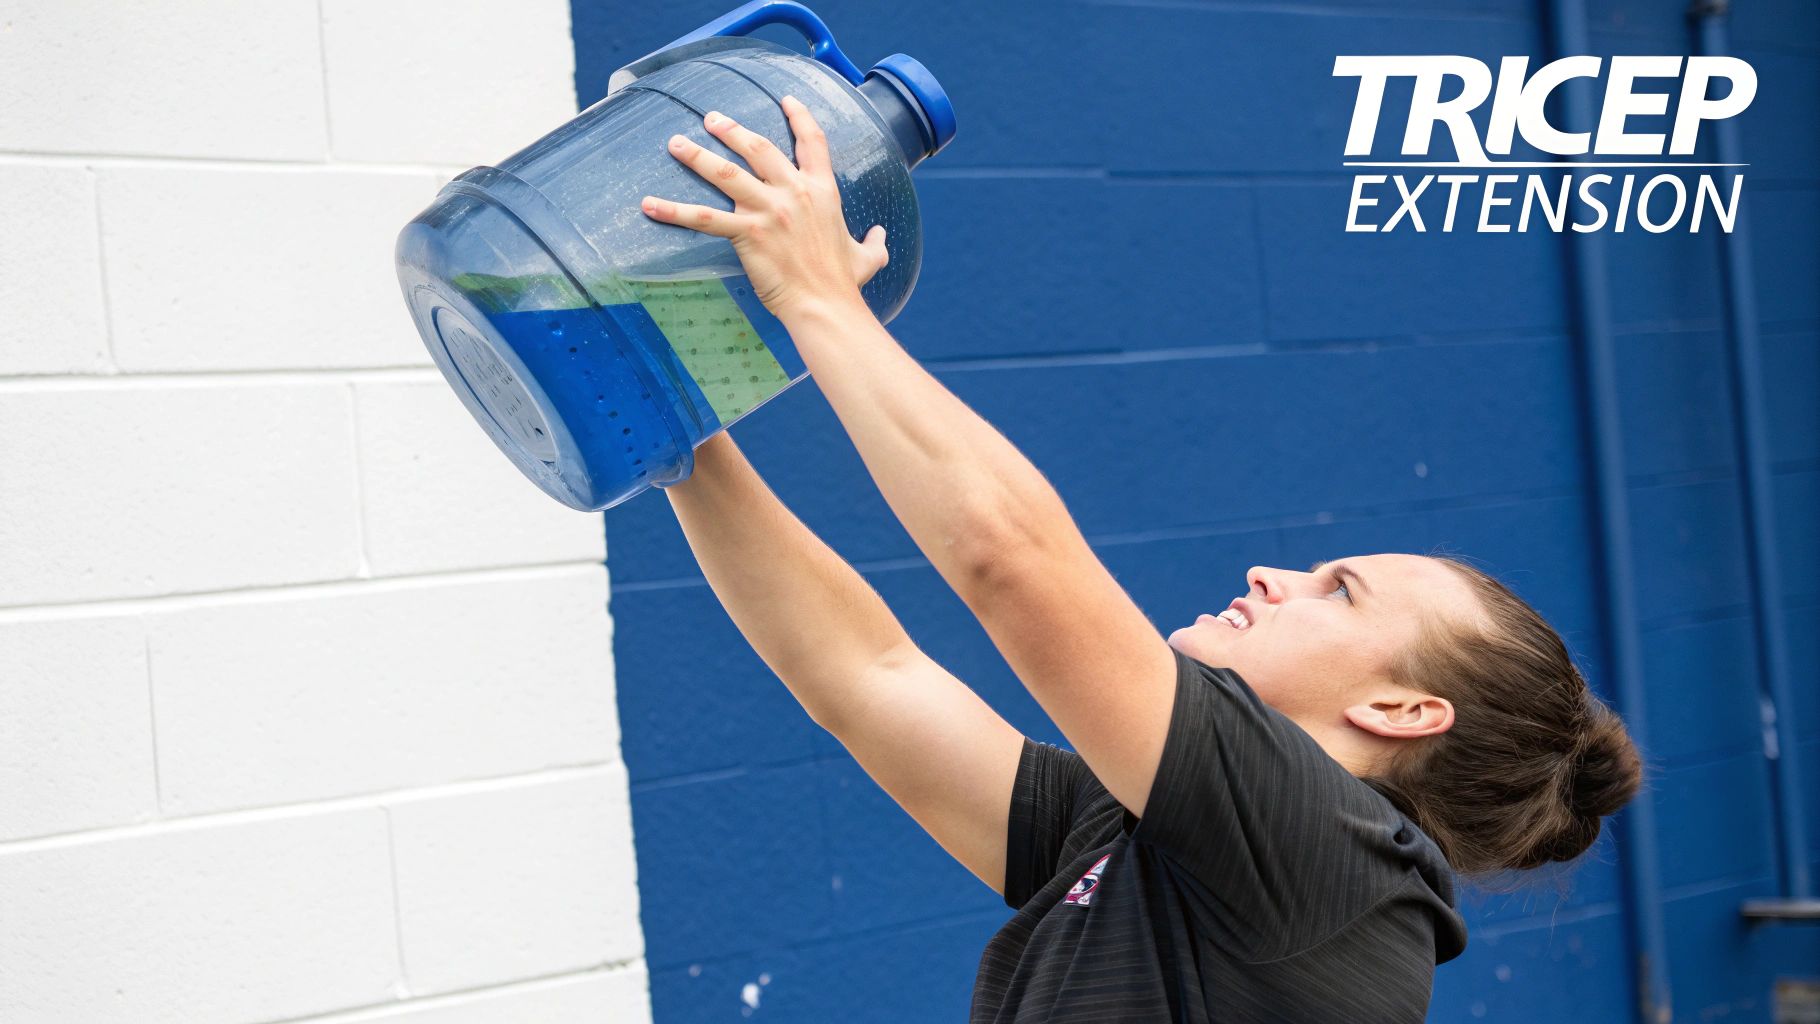
This movement isolates the long head of the triceps — the key to building both size and functional power. You don’t need dumbbells; a water jug, detergent bottle, or backpack filled with books will do the trick.
The controlled stretch under load creates deep activation in the muscle, helping with both hypertrophy and endurance. It’s perfect for balancing out all the pressing and pushing work.
How to Master It
Choose Your Weight: Hold your household item with both hands.
Position: Stand tall or sit upright, arms overhead, elbows near your ears.
Lower: Slowly bring the weight behind your head, elbows stable and pointed up.
Extend: Push back up, contracting the triceps fully at the top.
Pro Tip: Keep control during the negative phase — 3–4 seconds down. Seated variations reduce lower-back strain and improve focus. Try one arm at a time for balance.
4. Close-Grip Push-Ups
This is your bridge between standard and diamond push-ups. It’s a phenomenal way to overload your triceps with slightly less intensity while still demanding stability and control. The closer hand position forces your triceps to take the brunt of the work, developing endurance and pushing strength.
How to Master the Close-Grip Push-Up
Start: High plank, hands directly under your shoulders, then move them slightly inward.
Brace: Engage your core and glutes to create a straight, rigid line.
Lower: Bend your elbows close to your torso, controlling the descent.
Push: Drive up through your palms, focusing on tricep contraction.
Pro Tip: Can’t manage a full set? Drop to your knees. Use tempo training — 2 seconds down, 1 second up — to increase time under tension. Once strong, transition to diamond push-ups. Explore more progressions in our home calisthenics guide.
5. Tricep Kickbacks (Household Weights)
If you’re chasing that “defined arm” look while still training for performance, kickbacks are essential. They isolate the lateral head of your tricep — the part that gives your arms shape and definition — and can be performed with everyday items like water bottles or canned goods.
How to Master the Kickback
Support: Use a chair or bench for stability.
Position: Hinge at the hips, back straight, core tight.
Anchor: Raise your upper arm parallel to the ground; it stays locked there.
Kick: Extend your elbow until your arm is straight, squeeze, and return slowly.
Pro Tip: Don’t swing the weight. Momentum ruins the isolation. Keep it controlled — it’s all about the squeeze at the top. Start light and build tension over time.
6. Pike Push-Ups
While primarily a shoulder-dominant move, Pike Push-Ups also demand serious tricep involvement. The vertical pressing angle mimics overhead movements, making it an excellent stepping stone to handstand push-ups.
How to Master It
Position: Start in a downward dog pose; walk feet in until your body forms an inverted V.
Lower: Bend elbows and bring your head toward the floor between your hands.
Push: Drive up, engaging shoulders and triceps together.
Pro Tip: Want more challenge? Elevate your feet on a chair. Need to regress? Reduce the pike angle. This exercise builds the raw pressing power you’ll need for future strength milestones.
7. Plank-to-Push-Up (Tricep Plank Press)
This movement combines tricep endurance with total-core stability. It’s dynamic, functional, and a true upper-body endurance builder. Every rep transitions you between static and active tension, forcing your triceps to handle full-body control.
How to Master It
Setup: Begin in a forearm plank.
Push: Press up one arm at a time into a high plank.
Lower: Return to your forearms in a controlled motion. Alternate your lead arm each rep.
Pro Tip: Keep your hips still — wide stance for beginners, narrow for advanced. Go slow and controlled. For complementary strength, add our bodyweight back routine to improve posture balance.
8. Wall Tricep Extensions (Wall Push-Offs)
Perfect for beginners or active recovery days, wall tricep extensions are low-impact yet highly effective. By changing your distance from the wall, you can modulate intensity without any equipment — making it ideal for travel, rehab, or warm-ups.
How to Master It
Position: Stand 2–3 feet from a wall, hands shoulder-width apart.
Lower: Bend your elbows and bring your forehead toward the wall.
Push: Extend your arms to return, focusing on tricep engagement.
Pro Tip: The steeper your angle, the harder it gets. Once you can manage 3 sets of 20 reps comfortably, move to knee push-ups or dips. Great for warm-ups and joint-friendly training.
Tricep Workout Comparison Table
Exercise
Complexity
Equipment
Primary Benefits
Best For
Key Advantages
Diamond Push-Ups
Intermediate–Advanced
None
Max tricep activation
Strength & Endurance
No equipment, scalable, chest assist
Tricep Dips
Beginner–Advanced
Chair/Bench
Mass & strength
Home & gym
Scalable load, full range
Overhead Extension
Beginner–Intermediate
Household items
Long head development
Isolation & recovery
Full stretch, accessible
Close-Grip Push-Up
Beginner
None
Form & foundation
All levels
Transitional strength builder
Kickbacks
Intermediate
Household items
Definition & control
Precision training
Targeted isolation
Pike Push-Ups
Intermediate
None
Overhead tricep strength
Gymnastics progression
Shoulder-tricep synergy
Plank-to-Push-Up
Intermediate
None
Functional power & stability
HIIT / core workouts
Full-body integration
Wall Tricep Extensions
Beginner
Wall only
Low-impact endurance
Recovery / warm-up
Joint-friendly scalability
Final Word: Building tricep strength isn’t about vanity — it’s about performance. Stronger arms stabilize your stride, enhance swim strokes, and keep you powerful in the saddle. Master these moves and you’ll not only look stronger — you’ll perform stronger, longer, and more efficiently where it matters most: the finish line.
Sports Dietitian Bob Seebohar was the personal sports dietitian for the 2008 U.S. Olympic Triathlon team and takes a cutting-edge approach to nutrition with his Metabolic Efficiency
by Sarah1731Comments Off on Triathlon Fueling Guidelines
The combination of white, pink blast, total orange and bright crimson will mark Nike's presence in Tokyo across select performance and lifestyle products.
by Sarah1394Comments Off on Emily Sisson’s Recovery Plan
We’re all familiar with the afternoon slump. You’re going about your day, feeling fine, but then 2 p.m. hits—and instead of thinking about a pre-dinner workout, you’re suddenly thinking about a pre-dinner nap.
by Sarah2721Comments Off on The Best Foods to Keep Blood Sugar Steady
Contents1 MAXIMIZING RUNNING PERFORMANCE: THE IMPORTANCE OF PROPER NUTRITION1.1 COMMON MISTAKES RUNNERS MAKE WITH THEIR NUTRITION AND HOW TO AVOID THEM1.2 NEGLECTING TO FUEL BEFORE...
by September Dev2370Comments Off on Common mistakes runners make with their nutrition and how to avoid them
Contents1 Electrolytes & Amino Acids for Endurance Athletes: The Sugar-Free Fuelling Guide with LIVSTEADY™1.1 The 35km Wall That Stops Athletes in Their Tracks1.2 Why Most...
by Sarah1520Comments Off on Electrolytes & Amino Acids for Endurance Athletes: The Sugar-Free Fuelling Guide
Contents1 Best Caffeine Gel for Endurance: How Caffeine Fuels Performance1.1 Mocha Edge + Caffeine Edge (Box of 12)1.2 Vanilla Latte Edge + Caffeine (12)1.3 Salted...
by Sarah592Comments Off on Best Caffeine Gel for Endurance: How Caffeine Fuels Performance

 14Aug
14Aug 


Comments are closed